Boxwood leaves are supposed to be green in all sessions. If the leaves are turning Brown or Yellow or even drop, your plants are probably dying. However, there are at risk of some other diseases, like- Decline, root rot, blight, and nematodes.
Here in this article, I have tried to create a useful guide to help you to recover dying boxwood by identifying the cause and taking quick action.
However, the challenge relies on taking care of them throughout different seasons. Boxwood is prone to certain weather conditions such as winter burn and drought stress and is likely to suffer and die if you don’t take proper care. So how to revive a dying boxwood?
Revive Dying Boxwood
Boxwood is an evergreen shrub that appeals to most landscaper’s taste. If you are into formal and elegant landscaping, you will find this plant quite a decoration. There is a wide range of boxwood available for you to pick.
Whether you want to grow them to create a formal hedge, create an entry path in your garden, or simply as a houseplant, they are the perfect fit.
Low as it may be, there is still a chance that you can save your boxwood from dying with proper care and treatment. To avoid your boxwood from dying, we are here to give you hindsight about boxwood diseases and complications that you might face while growing your boxwood during the various season.
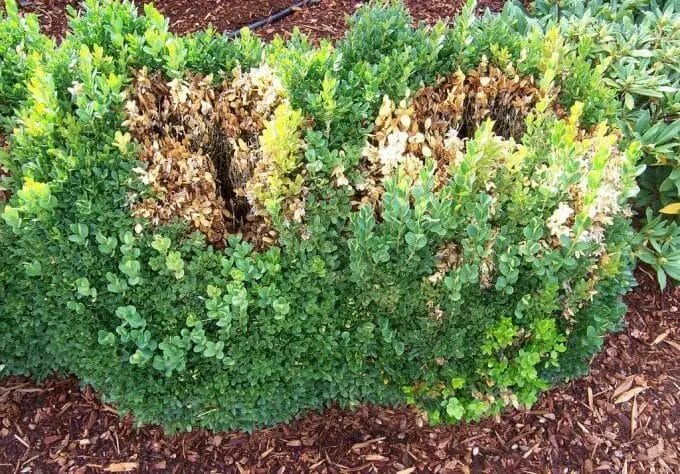
Why Boxwood Turning Brown in Summer?
When you are growing in outdoor, It is a common problem in summer. If you find these symptoms in your garden or lawn shrubs, then keep reading. However, in potted boxwood, it can arise in sessions.
Why does it happen?
In an instance, boxwood turning brown might struck you as boxwood blight. You have every reason to believe that your boxwood has blight as brown leaves are the key symptom of it. However, countless other look-alike problems might be turning your boxwood brown during summer.
Drought Stress- Due to Overwatering and Rain Fall
When shrubs such as boxwood don’t receive proper irrigation and rainfall for a longer period, their leaves start to turn brown. The underlying reason is drought stress which is quite severe for newly-planted boxwood. When you notice that the center of your boxwood leaves is turning brown, there is a good chance that your plant is suffering from drought stress.
Boxwood Leafminer
Leafminers start their journey in late winter as partially-grown larvae. As the days get warmer, the larvae become active and start to grow at a rapid rate.
During summer, they are the most active. They grow in the leaf blisters where larvae feed on tissues. When these larvae turn adult, they emerge from the leaves creating a hole. Ultimately resulting in an infestation that develops brown patches on the leaves.
Volutella Stem Canker AKA Volutella Blight of Boxwood
Volutella is a fungal pathogen that is caused by Pseudonectria Buxi which is additional insect damage besides leaf miners. Similar to leafminers, volutella starts their journey in spring. It infects the branches and loosens the bark. In an extreme case, part of boxwood is likely to die.
Steps you can take to revive your dying boxwood during summer
Preparing your Boxwood Against Drought Stress
These are the steps that you can take to better prepare your boxwood for drought stress-
- The very first step is to choose the right type of soil for your boxwood. The best thing to do is shop for an all-purpose garden soil that adapts to most external conditions.
- The next step is to apply a 3-inch layer of mulch above the soil. Mulch comes to the rescue as it keeps moisture from evaporating.
- Water your boxwood when you notice it is starting to wilt.
- Feed your boxwood with needed nutrients, liquid fertilizers will be of great help.
- Harvest rainwater and use this natural source to water your plant.
Defending your Boxwood Against Insect Attack
Insects can be quite a bummer and you need to defend your precious boxwood from their attacks. Follow these steps to give your boxwood a fighting chance against insects-
- Closely monitor and identify leaf tunneling and squeeze them to with your fingers to destroy any larvae.
- Identify infested leaves and pick them off the first chance you get.
- Use harvest-guard to keep flies away from laying eggs on the leaves of your boxwood.
- Diglyphus isaea is a parasitic wasp that kills leafminer larvae. They are commercially available and will prove to be beneficial against insect infestation.
- We don’t recommend this step, but as a last resort, you can use botanical insecticides. These natural pesticides are less harmful compared to synthetic chemicals and act quickly against insect infestation.
Tips for Taking care of Boxwood During Summer
- Regularly water your boxwood when the temperatures become extremely hot. Watering frequently and deeply to make sure water reaches the root zone of your boxwood.
- For adult boxwood that has been established, you need to water them every week.
- All-purpose soil is a must as it helps to care for your boxwood under varying weather conditions.
- You should have 2 to 3 inches of mulch layer for moisture retention. While mulching, avoid covering the trunks.
Yellow, Orange or Brown Leaves on Boxwood Shrubs
It is a common symptom that indicates Nutrient Deficiencies and Winter Burn. As you may know, there are three essential nutrients (nitrogen, phosphorus, and potassium ) in the soil. Inappropriate soil conditions often cause this problem.
Now,
How to Identify Nutrient Deficiencies and Toxicities?
The soil toxicities (high pH) and nutrient deficiencies are closely related. In short, if the nutrient is insufficient or excessive the soil pH value will vary. The recommended pH range for growing boxwood is 6.0 to 7.2. However, in most garden soil in the USA, we have encountered the pH level fluctuated from 4.5 to 6.5.
Boxwoods require healthy well drain soil to grow. When the soil nutrients are insufficient you may consider adding plants food into the soil. Adam Travis, have reviewed and written a detailed article on best boxwood fertilizers with fertilization guide. So, here I am not going to explaining that repeatedly.
Here is the shot but an effective way to identify nutrients deficiencies.
- After or in the late winters, if you observe tinged reddish-orange leaves ti may indicate a low nitrogen level.
- It may also symptomized drought stress or winter white burn.
- To detrain you must consider performing a soil and foliar test in late July or early August.
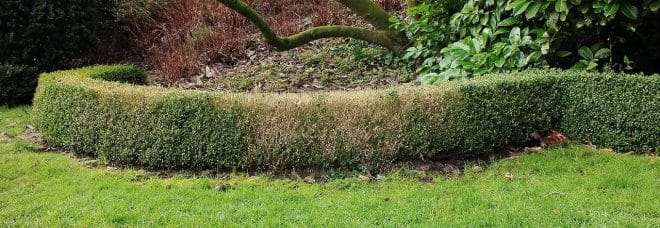
How to Identify Winter Burn?
Growing boxwood in a freezing environment can be quite a challenge as the environmental condition works against it. Gardeners living in a cold environment often reported about their boxwood leaf turning yellowish and brown quite often. This occurs due to ice-cold weather and excessive snow freezing up moisture.
All of these weather conditions result in winter burn, a problem that turns boxwood leaves yellowish or rusty. Ever seen leaves after they are singed on fire? Yeah, winter burn does that to your precious plants. If you fail to take action during the earlier stage of winter burn damage, the problem will spread and infect healthy boxwood
Now how does winter burn work? During photosynthesis, water is released as part of the transpiration process. Moisture evaporates through leaves of plants while this process is in action. However, during drought or extreme cold, plants fail to replace moisture and dehydrates. On an earlier stage, the leaves turn yellowish to brown, and in extreme cases, the plant completely dies.
Preventing Winter Burn
Now the presentation is always better than treatment as it offers long term solutions. To have a head start, your preparation should begin before winter even arrives. As there is a wide variety of boxwood available, you should pick one that has higher cold tolerance. Take the Wintergreen Korean boxwood for example as it has higher adaptability to cold conditions. Having a boxwood that has higher cold tolerance will help to avoid winter burn.
Picking the right planting time will also help your boxwood to avoid getting winter burns. You should consider planting your boxwood early spring as it will grow throughout the summer season and have increased strength. This will help your boxwood to sustain and have enough root strength to survive winter burn.
Pruning boxwood later summer is the worst thing to do and you should avoid it at all costs. Pruning this time of the year triggers new growth and the leaves will not be hard enough to suffer that wrath of upcoming winter.
Be sure to add a layer of mulch to hold needed moisture for your boxwood. Having layers of mulch will keep water residing in the soil to not to freeze for increased moisture retention. As boxwood needs water to stay healthy, mulching will come in handy to prevent winter burn.
Treating Winter Burn
Although the chances of treating boxwood from winter burn are quite low, if you can identify the symptoms quite early, you might just be able to save your precious plant from dying. With the right set of steps, you can bring your boxwood back to perfect health.
Fertilizer, especially granular ones will be of great help in treating boxwood that has suffered winter burn. We are not suggesting liquid ones as they are likely to freeze during winter. However, the granular ones are slow release and will provide needed nutrients for a longer period for increased survivability.
Root rot -The Most Common and Deadliest Disease
When you notice that the leaves of your boxwood are turning off-green and yellowish on single or multiple branches, your boxwood is likely suffering root rot. Root rot gradually turns the leaves dull and yellowish, resulting in their death. It’s hard to identify whether your boxwood is suffering root rot as surrounding branches might look healthy most of the time.
Surprisingly, the dead leaves will remain attached to the branches. These leaves manifest the infestation on the entire branch that they are attached to. Slowly, they start to infect healthy branches and kills the entire bush on the process.
The underlying cause of root rot is a fungus that starts to spread from corrupted soil. When the soil gets infected with the fungus, it then carries the fungus in the roots of the boxwood. The fungus may exist for years in your soil while doing nothing. When it is exposed to the right set of conditions, it starts to grow.
According to research conducted by Virginia Tech, they revealed that root rot has higher chances of occurring during winter. Boxwood left to expose to lower temperature has a higher chance of suffering root rot. While there is about a 10% chance that the bacteria might still cause root rot during moderate temperature as well.
Boxwood Root Rot Treatment
Unfortunately, root rot has no cure once it has infested your boxwood. The fungus is likely to remain indefinitely in your soil and no chemical will be able to control it. Don’t even bother replacing your boxwood with a new one as it will yield a similar result. The best thing to do is to replace the soil around the home.
As for the prevention of root rot of your boxwood, you can adopt these steps-
- You might want to transplant your boxwood with healthy roots. Firm white ones are the best root for transplanting purposes.
- When you are done gathering root for transplanting, the next step is to replace your previous soil with a soil that has a pH level of 5.5 to 7.5. Any number between this will be good to go.
- To further increase the drainage capability of your soil, you can blend your soil with perlite and course. This will improve the drainage and reduce fungus buildup.
- Avoid planting boxwood too deep in the soil and maintain the soil line of the container which the boxwood has arrived in.
- To regulate the soil temperature and retain moisture, you should add about 2 inches of mulch on top of the soil. Keep in mind that you need to water transplanted boxwood more frequently compared to a fool grown boxwood which needs watering every 10 days.
- Continue doing this until winter and feed your boxwood with a bone meal during early spring.
Some Tips for Preventing Root Rot
When you feel that your boxwood is giving out root rot symptoms, act on it as fast as possible to prevent further damage.
Remove boxwood from the soil and wash as much soil as possible out of the roots. This might still give your boxwood a chance to survive.
For affected roots, you might want to trim the infected part away using shears to stop the spread at an earlier stage.
Don’t forget to sterilize the shear that you have just used in trimming the infected root. If you don’t, the fungal spores have a higher chance to spread to the soil of other plants. Sterilize your shears using a blend of bleach and water with a 1/3 ration.
While shopping for boxwood soil, always prioritize on picking up a soil that has higher drainage capability. This helps to reduce fungus buildup that is responsible for root rot in the first place.
Although they grow slow, boxwood is worth growing as a landscaping effort. They offer diverse decorative themes that look elegant. Even in small houses, they add aesthetics with a little effort.
However, boxwood is quite expensive to grow and takes a good amount of effort too. As they are prone to a variety of weather conditions, they will cost you a lot if you fail to take proper care. As you won’t be able to revive a boxwood that is completely infected and/or dead, your only chance is to revive a dying one.
Final Words
We hope our guide on how to revive a dying boxwood will be informative enough to save your precious plant from dying. With a little bit of care, proper watering, and a good layer of mulching, your boxwood will have increased survivability in most weather conditions.
Now, if you have any questions please ask below. Also, if you find it helpful share it with other boxwood growers.